Sometimes we create a table with formula applied to specific column. And when we editing the table, for example inserting a new row with data into the table, we want the new data lists in the specific column is also applied with this formula as well. Normally we can drag down the upper cell applied with formula to fill the inserted cell, but if we can fill formula for inserted rows automatically, it will be much better. This article I will provide you two methods to do auto fill formula. The first method is by Create Table, and another method is by VBA code.
To demonstrate ‘Auto Fill Formula’ clearly, at first, we need to create a table with a simple formula applied on one column.

We create a table to count the score range for each student, then we can know whether they pass or fail the exam. And in C column, we use a formula =IF(B2>=60,1,2) to calculate the range.

Now, we want to insert some missing data into this table, and we want to get the range automatically.
Missing Data:

If we directly insert these rows into the table under row of ‘Joy’, we can get below result:
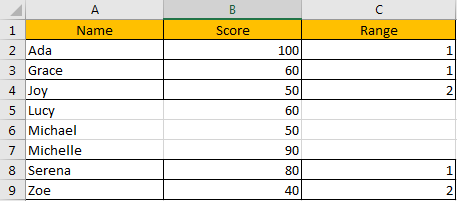
Noticed that Range is not auto calculated as we expect. So, we need to learn how to auto fill formula now.
Table of Contents
Method 1: Auto Fill Formula When Inserting New Rows/Data by Create Table
Actually, if we want to auto fill formula for the inserted new rows, we can make the initial table as an entire tables in excel. See details below.
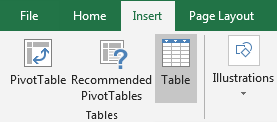
Step 1: In excel ribbon, click Insert->Table.
Step 2: In pops up ‘Create Table’ dialog, select the table range ($A$1:$C$6 in this case) as your table. Check on My table has headers. Otherwise a new header will be created on the top of your table improperly.
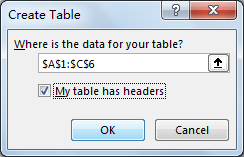
Step 3: Click OK. Verify that your table is updated.

Step 4: Insert a new row for test. Verify that 2 is auto displayed in Range column even there is no value in A5 and B5.
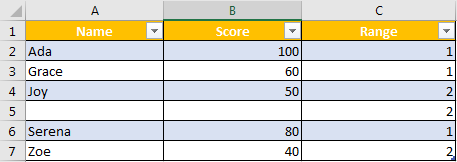
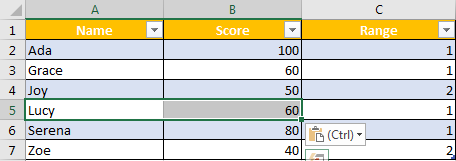
Step 5: In A5 and B5, copy and paste your missing data. For example, Lucy, 60. Verify that 1 is displayed in C5 now. The value is re-calculated automatically.
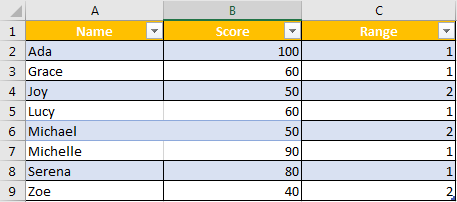
Step 6: Insert two new rows, then copy and past the other two rows of missing data in to column A & B, then range value will be auto calculated properly.
NOTE:
Please be aware that this method is only effective when inserting a new row firstly, then copy/paste data or type your data manually into the new row.
Method 2: Auto Fill Formula When Inserting New Rows/Data by VBA Code
Step 1: On current visible worksheet, right click on sheet name tab to load Sheet management menu. Select View Code, Microsoft Visual Basic for Applications window pops up.
Or you can enter Microsoft Visual Basic for Applications window via Developer->Visual Basic.
Step 2: In current sheet window, select Worksheet in General dropdown list.

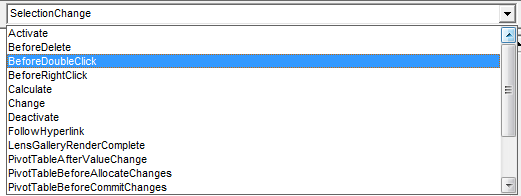
Step 3: In Declarations dropdown list, select BeforeDoubleClick.
Step 4: Edit VBA code.

Private Sub Worksheet_BeforeDoubleClick(ByVal Target As Range, Cancel As Boolean)

    Cancel = True

    Target.Offset(1).EntireRow.Insert

    Target.EntireRow.Copy Target.Offset(1).EntireRow

    On Error Resume Next

    Target.Offset(1).EntireRow.SpecialCells(xlConstants).ClearContents

End Sub
Step 5: Save the codes. And then quit Microsoft Visual Basic for Applications.
Step 6: Double click any cell among the table. A new row will be inserted under the clicked cell. For example, we double click a cell in row 3, then a new blank row 4 will be inserted. But the range value is auto displayed as 2.
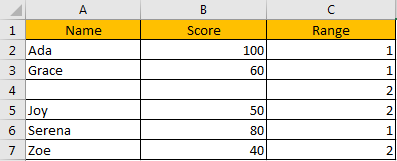
Step 7: Enter data into blank cells, range value will be re-calculated per your typing.
Related Functions
- Excel IF function
The Excel IF function perform a logical test to return one value if the condition is TRUE and return another value if the condition is FALSE. The IF function is a build-in function in Microsoft Excel and it is categorized as a Logical Function.The syntax of the IF function is as below:= IF (condition, [true_value], [false_value])….