This post will guide you how to delete blank or empty rows or rows that contain blank cells in excel. If you want to remove blank rows that contain blank cells, you can use the Go To Special command. But if you just want to remove rows that are entirely blank, you should use the Filter blanks cell way.You can also check out this tutorial if you need to insert multiple blank rows.
Table of Contents
- 1. Delete Blank Rows Manually
- 2. Delete rows that contain blank cells Using Go To Special
- 3. Delete Blank Rows Using Find Command
- 4. Delete Blank Rows with Filter Feature
- 5. Delete Blank Rows with Advanced Filters
- 6. Delete Blank Rows Using Sorting Command
- 7. Delete Blank Rows Using Power Query
- 8. Delete blank rows in Excel VBA
- 9: Video: Delete Blank Rows
1. Delete Blank Rows Manually
To delete a blank row in Excel, and the first method of deleting blank rows must be the manual way. Let’ s see the below steps:
Step1: you need to locate the blank rows you want to remove firstly. These are the rows with no data that disrupt the flow of information.
Step2: click row number to select the blank rows you want to delete. or you can press Shift + Space shortcut to select the entire blank row.
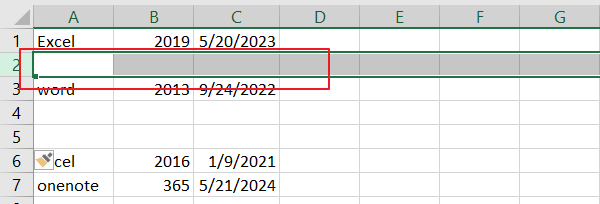
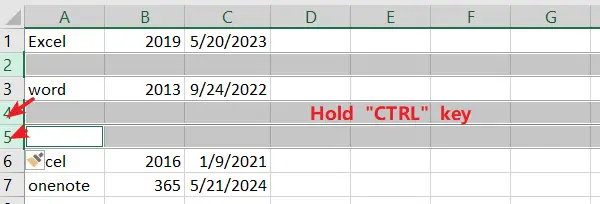
Step3: hold Ctrl key and continue clicking on the row numbers of the other blank rows you want to delete. This will select multiple rows at once.
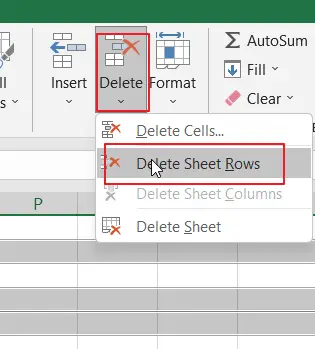
Step4: you can go to Home tab, click on the Delete command, then choose Delete Sheet Rows menu.
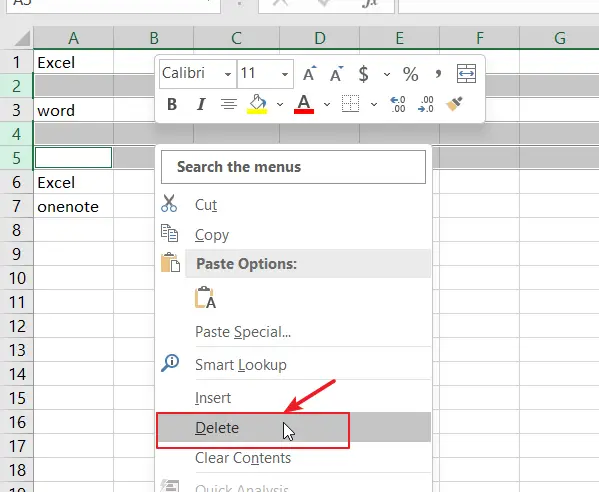
Or you can also right click on the selected blank rows, choose Delete menu from the drop-down menu list.
If you only have a couple blank rows, and you use this method to delete blank rows quickly. And if you have lots of blank rows in your worksheet, and you can use the following methods in this tutorial.
2. Delete rows that contain blank cells Using Go To Special
You can use the Go To Special command to remove all rows that contain blank cells, just do the following:
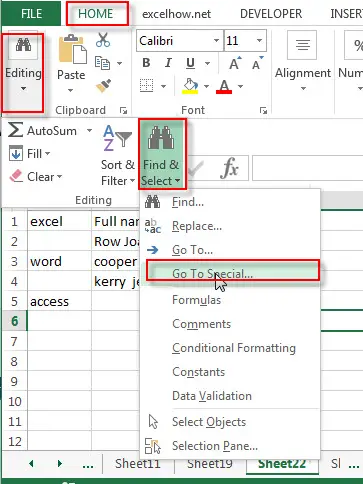
Step1: on the HOME tab, click Find & Select command under Editing group
Step2: click Go To Special
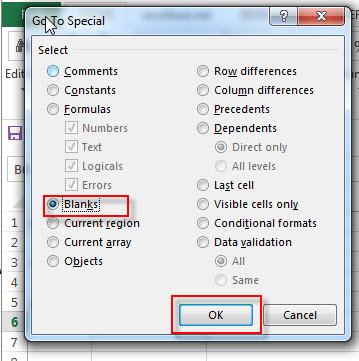
Step3: Select Blanks radio button and then click OK button.
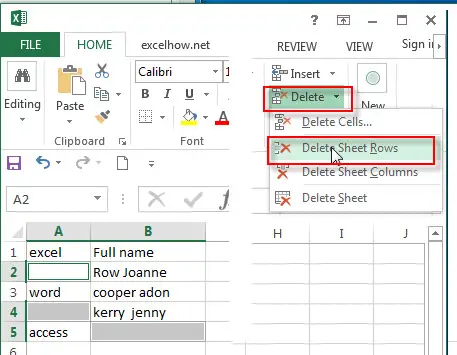
Step4: you will see that all rows that contain blank cells are selected.

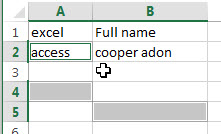
Step5: go to HOME tab, click Delete command under Cells group. Then click Delete Sheet Rows from the drop down menu list.
3. Delete Blank Rows Using Find Command
You can also select all blank rows using the Find command in Excel. Then you can delete those selected blank rows.
Step1: open your worksheet where you want to delete the blank rows.
Step2: press Ctrl +F shortcut to open the Find and Replace dialog box. Or go to Home tab, click on Find & Select command under Editing group. clicking Find menu from the drop down menu list.

Step3: click on the Option button firstly, it will expand the options if there are not visible.

Step4: leave the Find what text box as blank, enable Match entire cell contents option, choose Sheet option in the Within drop down list, ensure that the Search field is set to By Rows, and choose Values option in the Look in drop down list.
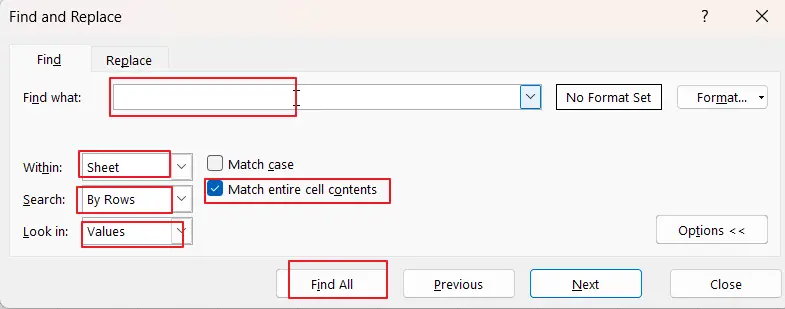
Step5: Press Find All button. All the blank cells would be listed.
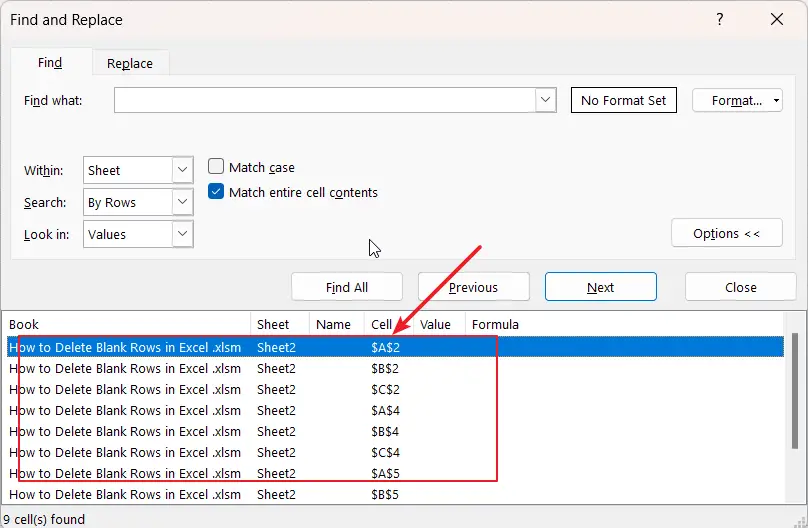
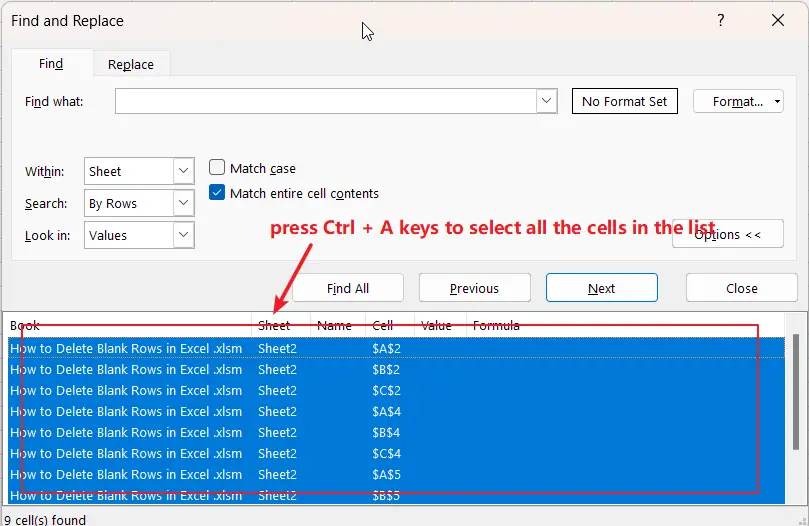
Step6: press Ctrl +A shortcut to select all the cells in the list. click Close button to close the Find and Replace dialog box.
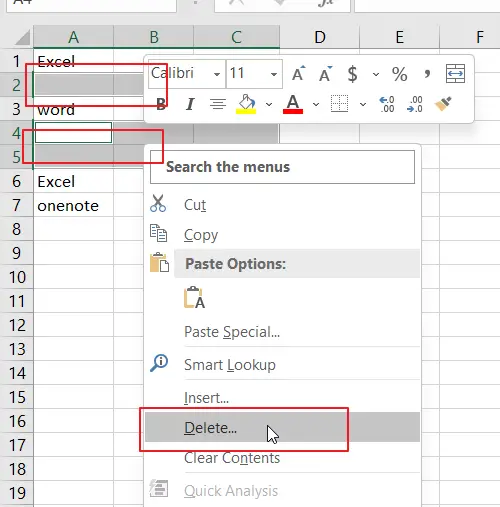
Step7: right click on any of the selected blank cells and choose Delete menu to delete all the blank rows.
4. Delete Blank Rows with Filter Feature
If you want to remove blank rows in excel, and you need to find the entire blank rows firstly, so you can use the Filter function to filter all blank rows, just do this following:
Step1: select the range of cells that you want to remove blank rows

Step2: on the DATA tab, click Filter command under Sort& Filter group.
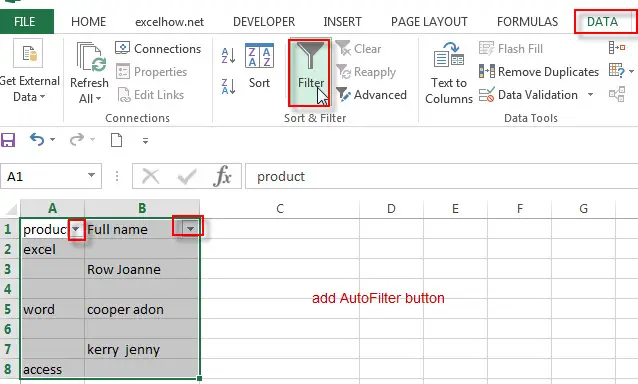
Step3: click Filter arrow button and uncheck the Select All box, just check only Blanks, then all blank rows in that column will be filtered.
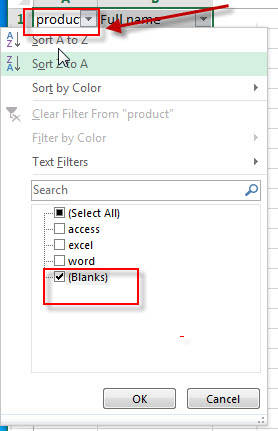

Step4: you need to continue to filter other columns for blank cells until all cells in the selected range are blank.
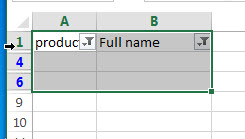
Step5: select all the filtered rows, go to HOME tab, click Delete command under Cells group. Then click Delete Sheet Rows from the drop down menu list.
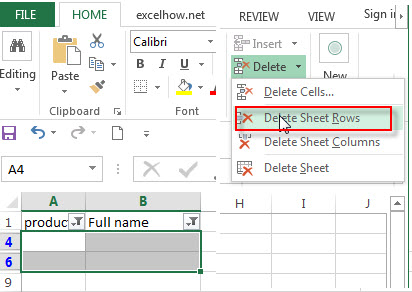
Or just right-click on the selected cell and then click Delete Row from the drop-down menu list.
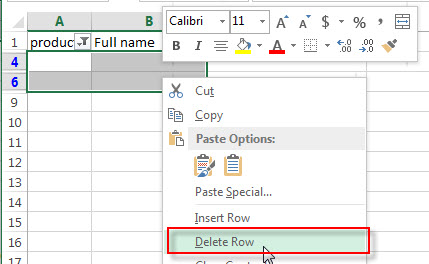

Step6: on the DATA tab, click Clear command under Sort & Filter group.
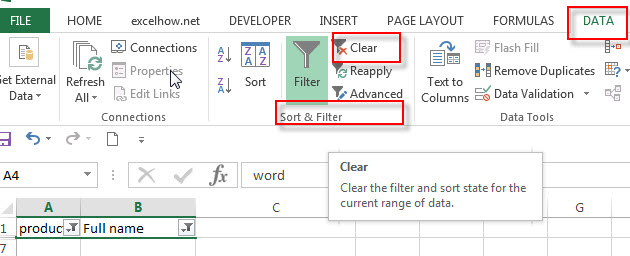
Step7: you will see that all blank rows are removed.

5. Delete Blank Rows with Advanced Filters
There is another Filter option to help use delete all rows in Excel. And you can use the Advanced Filters option to copy your data to another location without any blank rows.
Step1: open your worksheet where you want to delete the blank rows.
Step2: you need to setup a filter criteria range based on one column heading in your original data, such as, Cell A1. You need to use the below two formulas as criteria range.
=A1=""Enter the first formula into Cell G1, and type the second formula into Cell G2.
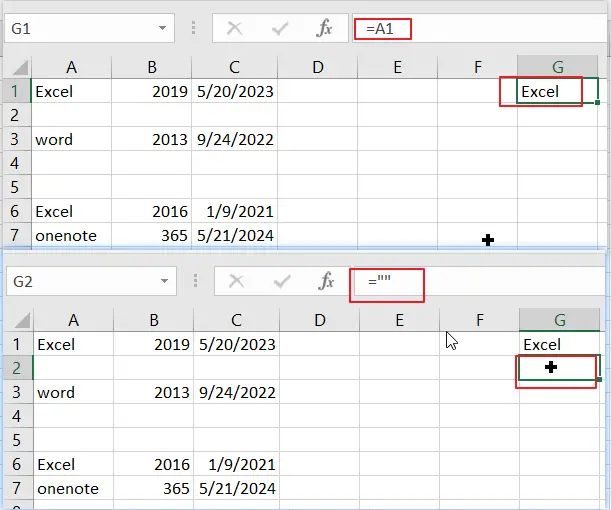
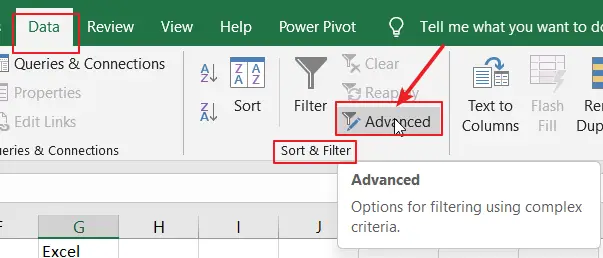
Step3: go to Data tab, click on Advanced command under Sort & Filter group.
Step4: enable copy to another location option, select your original data($A$1:$C$7) as List range, select G1:G2 as your criteria range, and then select one blank cell to place the filtered data.
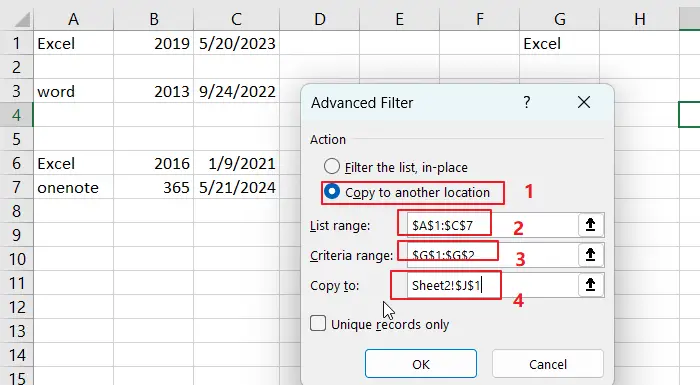
Step5: press Ok button. You would see that all the data without any blank rows have been copied to another location.

6. Delete Blank Rows Using Sorting Command
You can also use Sort command to sort your original data so that you can ignore or delete all blank rows.
Step1: open your worksheet where you want to delete the blank rows.
Step2: select your original data that contain blank rows(A1:C7).
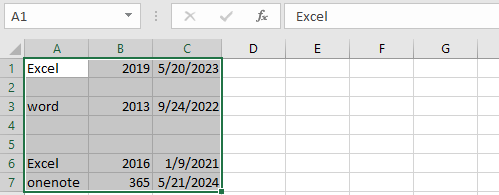
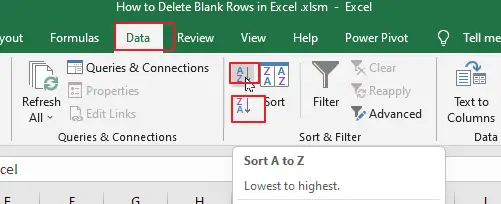
Step3: go to Data tab, click on Sort A to Z command under Sort & Filter group. both the ascending or descending order can work well.
Step4: Now you would see that all the blank rows were moved to the bottom of your original data, and just ignore them.

Note: To keep the original sort order of your data, you can add the index number in a helper column next to your data before Step3. Type number 1 in Cell D1, and drag the Fill Handler down to cell D7 to fill series. Run the step3 to sort your data. then you can sort the filter data to restore the original order based on the helper column.

7. Delete Blank Rows Using Power Query
Power Query Editor is a powerful tool to help you quickly removing blank rows in Excel. As It has an built-in feature to remove blank rows for your table or range.
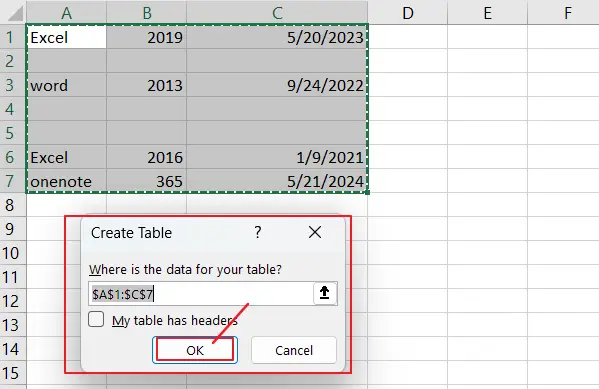
Step1: select your range of cells that contain blank rows, such as, A1:C7.
Step2: right click on it, and select Get Data from Table/Range menu from drop down menu list.
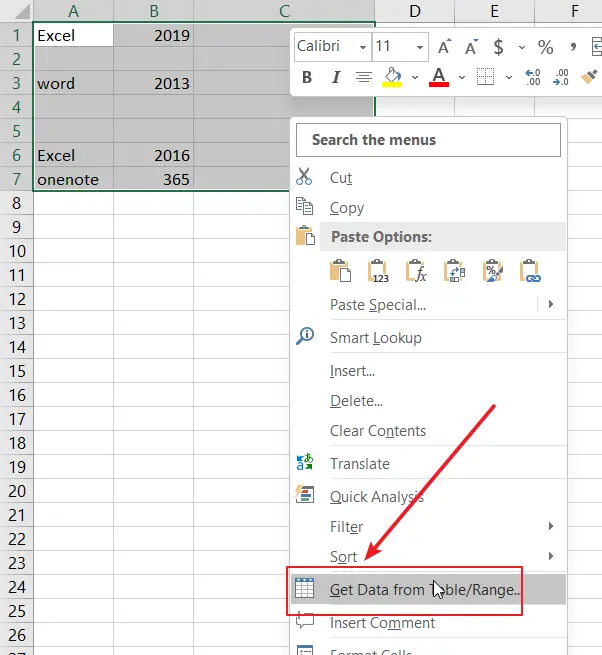
Step3: click Ok button in the Create Table window.
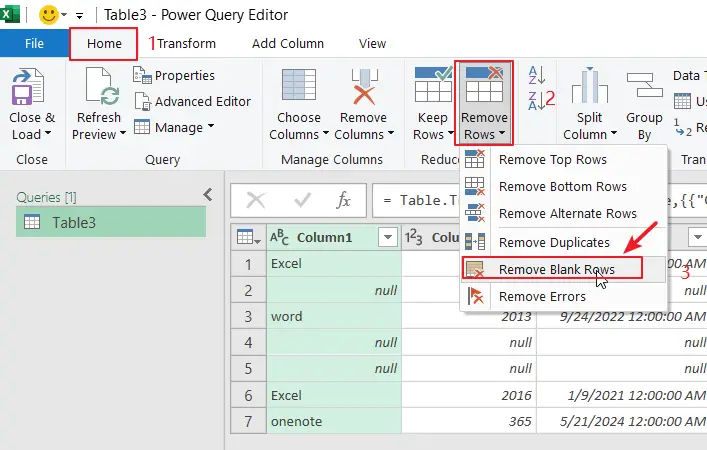
Step4: the Power Query Editor will open. Go to Home tab, and press the Remove Rows button, select the Remove Blank Rows menu.
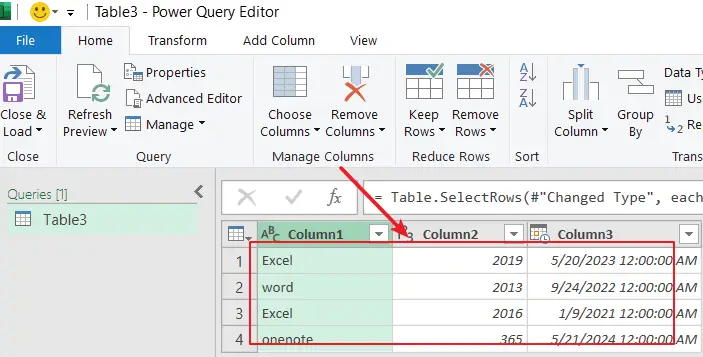
Step5: you can see that all the blank rows should be removed immediately in the Power Query Editor.
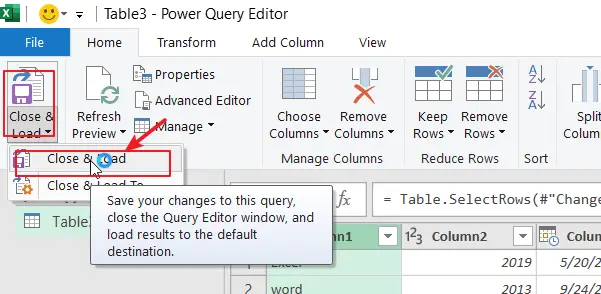
Step6: click Close & Load button, it will back to your current worksheet.
8. Delete blank rows in Excel VBA
You can also write an excel Macro to delete blank rows in excel, just refer to the following steps:
1# click on “Visual Basic” command under DEVELOPER Tab.
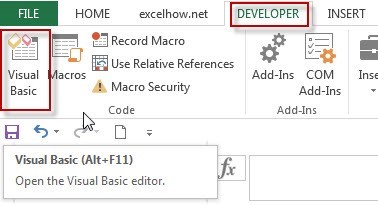
2# then the “Visual Basic Editor” window will appear.
3# click “Insert” ->”Module” to create a new module
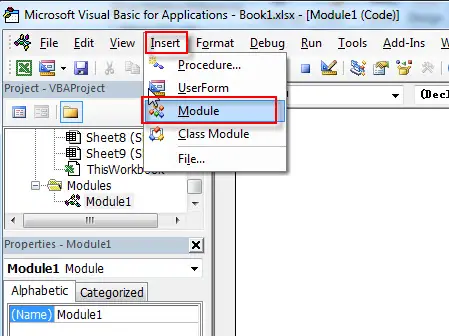
4# paste the below VBA code into the code window. Then clicking “Save” button.
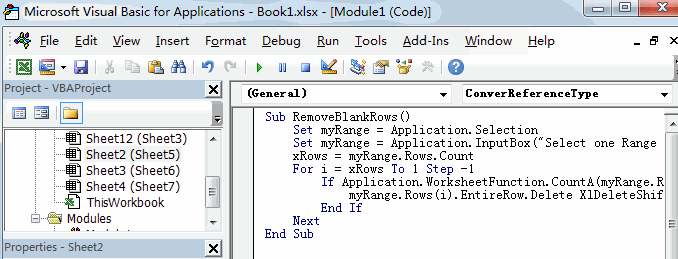
Sub RemoveBlankRows()
    Set myRange = Application.Selection
    Set myRange = Application.InputBox("Select one Range that you want to remove blank rows", "RemoveBlankRows", myRange.Address, Type:=8)
    xRows = myRange.Rows.Count
    For i = xRows To 1 Step -1
        If Application.WorksheetFunction.CountA(myRange.Rows(i)) = 0 Then
            myRange.Rows(i).EntireRow.Delete XlDeleteShiftDirection.xlShiftUp
        End If
    Next
End Sub
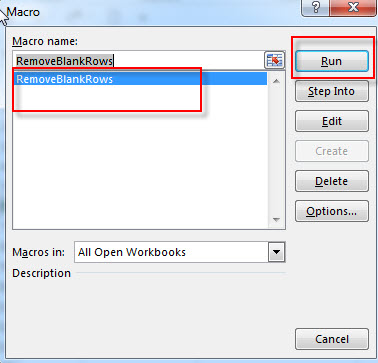
5# back to the current worksheet, then run the above excel macro.

9: Video: Delete Blank Rows
This video will show you eight defferent methods to delete all the blank rows in Excel 2013/2016/2019/365.
Leave a Reply
You must be logged in to post a comment.