This post will guide you how to make your current worksheet as read only in excel. How to save multiple worksheets in your workbook as read only. How do I make a workbook as read only to make sure that any changes made by other users do not get saved to the original workbook or worksheet in excel.
If you do not want other users to change the worksheet or workbook, you should be set the file as Read-only mode to decrease the risk of the workbook being changed.
Table of Contents
Read Only Worksheet
If you just want to choose the option of “read-only” mode for only one worksheet, just follow these steps to protect sheet:
#1 switch to the worksheet that you want to change as read only mode
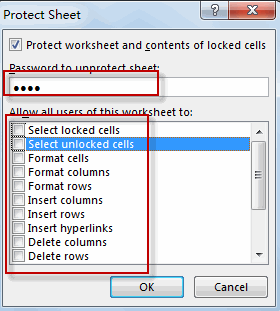
#2 go to REVIEW tab, click Protect Sheet command under Changes group. The Protect Sheet dialog will appear.

#3 type password to Password unprotect sheet text box, and uncheck all options in the Allow all users of this worksheet to list box. Click OK button.
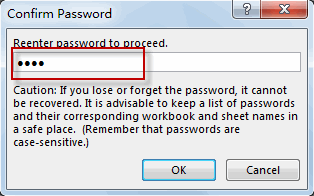
#4 retype password in the Reenter password to proceed text box, and click OK.
#5 when you try to change the worksheet, a warning box will pop up to warn you that this worksheet has been protected, and you need to enter a password to unlock it.

Read Only Workbook
If you want to make your current workbook as read only mode, just do the following steps:
#1 open your workbook that that you want to change to read only mode.
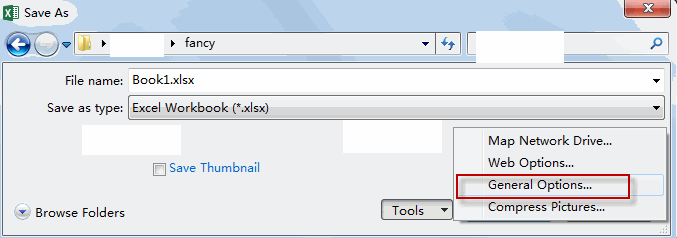
#2 go to FILE tab, click Save As menu from the File menu list, then Save As dialog will appear.

#3 select General Options from the Tools drop-down menu list. The General Options dialog will appear.
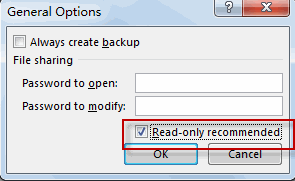
#4 check Read-only recommended checkbox, and click OK button.
#5 click Save button. So far, your workbook has been change to read-only mode.
#6 when you save this workbook, the Confirm Save As dialog box will appear, and you can click Yes button to save as this workbook as another new file.

Leave a Reply
You must be logged in to post a comment.